98-02 Saturn S-series Fuel Filter Replacement
Disclaimer:
I am not a mechanic. These instructions are a conglomeration of several other how-to documents, Saturn FSMs, shop manuals, online postings and other sources of information. These instructions should not be considered a stand alone document and should be used in conjunction with an FSM, Haynes, or Chiltons manual. These instructions are in no way authorized, approved, or otherwise condoned by Saturn Corp. If you render your car undrivable, unsafe, or just plain broken I am in no way responsible. If you are an idiot, moron or just plain stupid do not attempt this repair.
Introduction:
The 1998-2002 Saturn S-Series Fuel Filter is rated for 100,000 miles and should not need to be replaced before then (unless you use really crappy gas). The fuel filter includes an integrated fuel pressure regulator making the part fairly expensive ($65-$95). The fuel pump is located inside the gas tank and is not a subject of this document.
This is a fairly simple repair. On a scale of one to ten with an oil change being a one, pads and rotors being a three I would rate this maybe a two. The biggest obstacle to overcome with this repair is locating the actual items on the car. It should only take aproximately 30 to 45 minutes if you have never done this before and if you go really slow. The most time consuming part is getting the car up on jack stands. Note this How-To is for the newer S-Series (98-02), older S-Series fuel filters are completely different and located in a different location. Most of the photos are from a 2001 SC2, your vehicle may be slightly different.
Tools and parts needed:
- Usual hand tools
- Jack
- Jack Stands
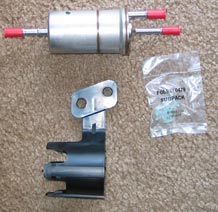
- New Fuel Filter With Bracket (SAT21009427)
- Catch Basin/Drip Pan
1. Remove the fuse for the Fuel Pump. It is located in the passenger fuse box.
2. Start the car and let it idle until it stalls.
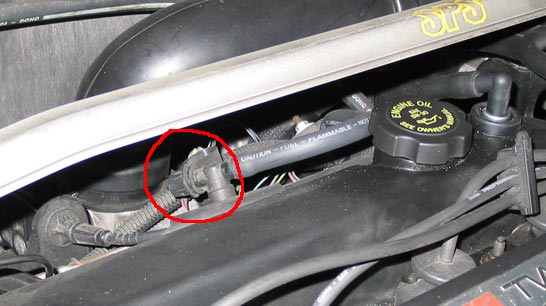
3. Locate the Schrader valve under the hood. Remove the screw on black cap and depress the valve. Have a rag handy to catch the small amount of fuel that will escape. Your Fuel System is now depressurized.. (Remember to resecure the black cap.)
4. Jack up the rear of the car and support it with jack stands. Make sure the car is high enough for you to comfortably work underneath it and that it is secure. Don't be the idiot that kills themselves by dropping a car on your head. (They usually don't think it will happen to them either.)

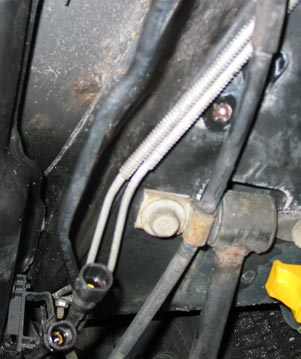
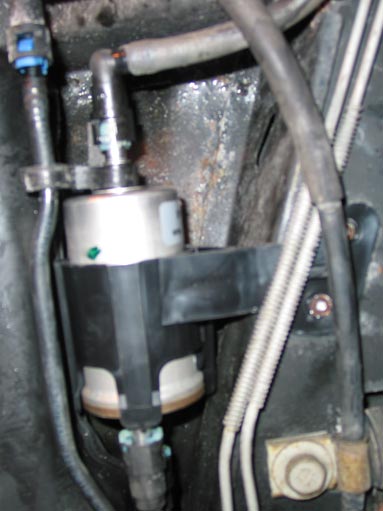
5. Lay down under the car and locate the original fuel filter. It will be on the drivers side just forward of the gas tank. Note the location of the two bracket retaining bolts and the three fuel lines entering and exiting the filter.
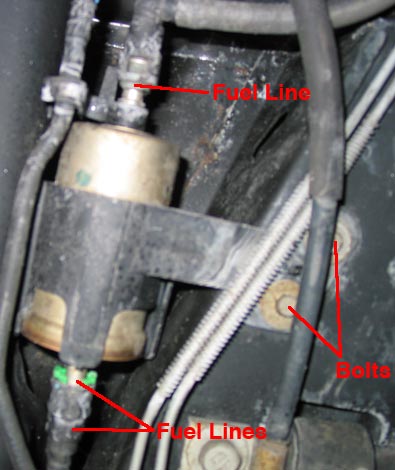
6. I found it easiest to remove the two bolts holding the bracket first. Note, these bolts have been under your car exposed to rain, snow, salt and other nasty stuff for probably 100,000 miles if not longer. It is very likely that they will be rusted in place. These are very skinny bolts and will break off easily. Also note that the brake line may be in the way making it difficult to use a socket in this location.
7. After you have removed the bolts disconnect the fuel lines. These connectors are a two part system requiring you to squeeze the inner plastic clip and pull the line. Be careful, while the system is no longer pressurized the filter is still full of fuel, quite a bit of it. Don't lay down directly under the filter when disconnecting the lines or you will get a face full of fuel. Have your drip pan ready to catch whatever pours out.
8. Insert the new filter into the new bracket and attach the new clips. (If you bought an OEM filter it should come with the bracket and clips. If you didn't buy an OEM filter good luck getting the old filter out of the bracket.)
9. Slide the bracket and filter into place and attach the fuel lines.
10. Reinstall the bolts that hold the bracket in place.
11. Lower the car.
12. Reinstall the fuel filter fuse.
13. Turn your ignition key to the RUN position and hold it a few seconds, you should be able to hear the fuel pump repressurize the fuel system and fill the new filter full of fuel.
14. Start the car. If the car doesn't immediately turn over you may need to slightly depress the gas pedal.
15. Check for leaks. Go for a short test drive and check for leaks again.
Congratulations! You have changed your fuel filter!
Many thanks to Jeff Putnam, Bill Kuhns, Lane, Kevin Keller, John Comskey, Wolfman, Ssicarman, SaturnSpeed, SPS, SaturnFans.com, SPOCNE, and everyone else.
If you find a problem with these instructions or a better way of doing things, or something I’ve missed please let me know.
Updated versions of this document can be found at http://www.cristhomas.com/cars/GasFilter/GasFilterHowTo.html
Permision is hereby granted to republish and distribute this document provide that no changes are made. This includes but is not limited to the introduction, disclaimer and URLs.
Written By: Cris Thomas (cthomas AT spocne DOT org)
Last Updated: January 30, 2005